
SimulIDE Knowledge Base
– COMPILERS –
SimulIDE does not distribute any compiler.
To use a compiler it must be installed in your system and working properly.
Then SimulIDE can use it by executing it’s command and arguments.
This is achieved by configuring the compiler command and options in XML files located at SimulIDE/data/codeeditor/compilers/ or User_data_folder/codeeditor/compilers/
There are some compilers already configured included in SimulIDE, but you might need to tweak some settings within the XML file according to your compiler’s specifications (e.g., altering the executable name or extension for Windows).
See File Structure below to know how these files work and how to edit them or add new compilers.
If you have any questions please ask in our forum
Some compilers are automatically loaded for some file extensions, for example:
.ino : Arduino compiler.
.gcb: GcBasic compiler.
.as : Script compiler.
If your file has a different extension, you need to choose a compiler for that file or create a new one.
Settings:
In version 1.0.0, open “Compiler Settings” in the tool bar by selecting it from the  Settings menu and choose a compiler from the list.
In version 1.1.0 first choose a compiler in “File Settings” then configure the compiler in “Compiler Settings”.
Once there, customize any options (like ‘Tool Path’) if necessary.

Options can be different for each compiler and will be added depending on the fields used in the configuration file.
Compiling:
Once the compiler is configured you can compile the file by clicking in the compile button in the tool bar: 
Have a look at the bottom panel to see the output of the compiling process and check if there is some error.
If there are no errors you can upload the hex file generated to a microcontroller in the circuit by clicking the upload button in tool bar: 
If you click the upload button it will compile first and then upload.
Important!!
Note that if there is more than one microcontroller in the circuit, the hex file will be uploaded to the “active” microcontroller, which is the one with a yellow dot:
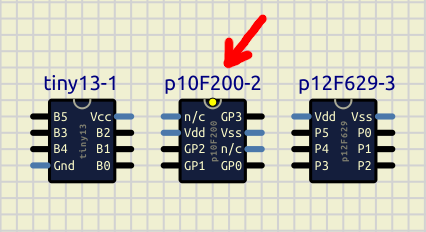
To change the “active” microcontroller, right-click on it to open context menu and select “Main Mcu”
Adding Compilers:
Compilers are defined in xml files located at:
SimulIDE_1.x.x/data/codeeditor/compilers/compilers
SimulIDE_1.x.x/data/codeeditor/compilers/assemblers
These xml files define the type of compiler, build path, build steps, syntax highlighting, and other atributes needed by be compiler.
If the compiler you want is not included in the list, you can add new compilers.
To add a compiler, just add an xml file in the folders mentioned above.
Your compiler will be added to the list in Compiler Settings dialog.
File structure:
The structure of the xml file is like this:
<compiler name="anyName" type="xx" buildPath="somePath" syntax="f.syntax" >
    <step
        command="executable"
        arguments=" arguments for executable"
        argsDebug=" arguments for executable in debug mode"
    />
    <step
        command="executable2"
        arguments=" arguments for executable2"
        argsDebug=" arguments for executable2 in debug mode"
    />
</compiler>
First the compiler name, type and other characteristics are defined in the field “compiler”.
Then you can add as many build steps as you want in fields “step”.
Field “compiler”:
<compiler name="anyName" type="anyType" buildPath="somePath" syntax="syntaxFile" >name: This name will appear in the compiler list in Compiler Settings dialog.
type: can define certain characteristics of the debugger.
You can encode some characteristics in 2 numbers at the end, for example when type=“myType01”
The key is in the last 2 numeric digits: “01”.
From left to right:
First digit "0*" language level:
Value can be 0 or 1: 0 for asm, 1 for high level
Second digit "*1" lst file type:
Value can be from 0 to 3:
- Bit 0: use “:” ?
0 doesn’t use “:” (gpasm ).
1 uses “:” (avra, gavrasm)
- Bit 1: position of flash address (0 or 1)
buildPath: folder to be used as build path by the compiler.
You can use “substitutions”, for example if the source file is:
And you define buildPath like this: buildPath=“build_$fileName”
Then a folder with name build_myfile will be created and used as build path.
Note that you must use this path in your command arguments if needed (see example below).
syntax: syntax file used for highlighting.
Syntax files are located at: SimulIDE_1.x.x/data/codeeditor/syntax/
You can add your custom syntax files in that folder and use in your compiler definitions.
Build steps:
You can add as many build steps as you want.
Each step need to have at least a “command”.
    <step
        command="executable"
        arguments=" arguments for executable"
        argsDebug=" arguments for executable in debug mode"
    />
command: command to execute.
arguments: arguments to add to the command when compiling.
argsDebug: arguments to add to the command when compiling for debug.
Substitutions: You can use some substitutions in your command arguments and other values.
For example $FilePath will be replaced with the actual path to the source file.
Let’s say we have this source file: /home/user/myfile.asm
Then we can use these substitutions:
| Wildcard | Example | Replaced with |
|---|---|---|
| $filePath | /home/user/myfile.asm | complete file path |
| $fileDir | /home/user/ | path to file folder |
| $fileName | myfile | file name (without extension) |
| $fileExt | .asm | file extension (with dot) |
| $buildPath | - | build path (defined in xml file) |
| $inclPath | - | include path (defined in Settings Dialog) |
| $family | - | device family (defined in Settings Dialog) |
| $device | - | device model (defined i Settings Dialog) |
Example:
This is a simplified version of the xml file for Avr gcc compiler:
<compiler name="Avrgcc" type="avrgcc" buildPath="build_$fileName" useDevice="true">
  <step
    command="avr-gcc"
    arguments=" -mmcu=$device -Os -o $buildPath$fileName.elf $filePath"
    argsDebug=" -mmcu=$device -Og -o $buildPath$fileName.elf $filePath"
  />
  <step
    command="avr-objcopy"
    arguments=" ihex $buildPath$fileName.elf $buildPath$fileName.hex"
  />
<compiler/>
Let’s say that we are compiling a file with path: /path/toMyproject/mycode.c
And we have these settings for the compiler:
Tool Path: /path/to/myCompiler/
Device: atmega8
It will do these substitutions for the first build step:
buildPath=“build_$fileName” is changed to: buildPath=“/path/toMyproject/build_mycode”
-mmcu=$device is changed to: -mmcu=atmega8
buildPath * * ischangedto : * * /path/toMyproject/buildmycode/ * * < br > * *fileName is changed to: mycode
So $buildPath$fileName.elf becomes: /path/toMyproject/build_mycode/mycode.elf
$filePath is changed to: /path/toMyproject/mycode.c
In this case, because we indicated a buildPath, it will automatically create the build folder:
/path/toMyproject/build_mycode
And the complete command it will execute for the first build step is this (all in one line):
"/path/to/myCompiler/avr-gcc" -mmcu=atmega8 -Os -o /path/toMyproject/build_mycode/mycode.elf "/path/toMyproject/mycode.c"