Forum breadcrumbs - You are here:ForumGeneral: Circuits and examples made in SimulIDE354__LITHIUM ION BATTERY CHARGER_ …
You need to log in to create posts and topics.
354__LITHIUM ION BATTERY CHARGER_2
Defran@defran
125 Posts
#1 · February 25, 2024, 11:59 pm
Quote from Defran on February 25, 2024, 11:59 pm
354__LITHIUM ION BATTERY CHARGER_2 (Simulide R2194 or Higher).
This example is another version of battery charger number 352. This is also a lithium battery charger with automatic disconnection when charging is complete. It is designed for any battery as long as the voltage and current adjustments are made for the battery to be charged. Here, by default, 1.5V is used. Charging begins automatically when powering the circuit but you must first insert the battery. During the charging time, the voltage increases and this status is shown by the CHARGING LED flashing. When it reaches the end, this LED turns OFF and the charging voltage is disconnected. To charge a new battery, remove the charged one, insert the new one and press the [CHARGE] button. with which the process is repeated.In the simulator chargeable battery cannot be inserted physically, so the simulation is done with the sliding potentiometer from the bottom, empty battery position to the top, full battery.SCHEMA:The LM317 regulator is used in the current control configuration whose adjustment is obtained with the BD139 transistor and the associated potentiometer. The emitter of this transistor is connected to the battery with the ampmeter in series and the voltmeter to measure the charging values. The battery voltage is controlled by a comparator from the voltage setting, the output of this is applied to the input "S" of the flip-flop configured by two opamps. The "R" input is controlled by the [CHARGE] button and the autoreset RC cell. This FLIP-FLOP is really the novelty of this version of the charger, the purpose is to do all the control with a single integrated circuit, the quadruple opamp LM324. The output of this FLIP-FLOP controls the BD137 transistor, which cuts off the power to the regulator when the charged battery voltage is reached.ADJUSTMENT: Without any battery connected, move the cursor of the “BATTERY SIMULATION” potentiometer to the lower point (EMPTY), adjust the maximum value of charging current with the “CURRENT LIMIT” potentiometer, then gradually increase the value of the “LIMIT VOLTAGE" potentiometer until reaching the Maximum Voltage value for the inserted battery (this value must be above the nominal value of the battery for charging to occur). This setting is only necessary if you change the battery typeSUBCIRCUITS:This example integrates several subcircuits located in the "data" folder into the ZIP attached. This folder must always be next to the "sim1" scheme so that it can be executed. A subcircuit is a “custom” circuit that accumulates a set of Simulide base components (primitive function) to obtain a new or an adapted function. These subcircuits are treated by Simulide as another component of its own structure. User can create his own subcircuits or use the ones published here in your own designs once the procedure is known, explained in detail in the Simulide tutorials: https://simulide.com/p/subcircuits/* Communication with the author: Simulide/User/Messages/DefranP. de Francisco.

354__LITHIUM ION BATTERY CHARGER_2 (Simulide R2194 or Higher).
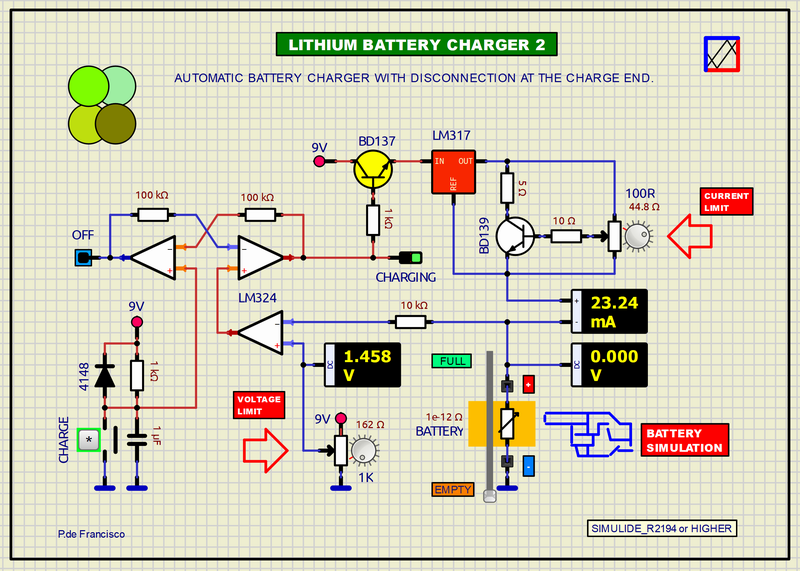
This example is another version of battery charger number 352. This is also a lithium battery charger with automatic disconnection when charging is complete. It is designed for any battery as long as the voltage and current adjustments are made for the battery to be charged. Here, by default, 1.5V is used. Charging begins automatically when powering the circuit but you must first insert the battery. During the charging time, the voltage increases and this status is shown by the CHARGING LED flashing. When it reaches the end, this LED turns OFF and the charging voltage is disconnected. To charge a new battery, remove the charged one, insert the new one and press the [CHARGE] button. with which the process is repeated.
In the simulator chargeable battery cannot be inserted physically, so the simulation is done with the sliding potentiometer from the bottom, empty battery position to the top, full battery.
SCHEMA:
The LM317 regulator is used in the current control configuration whose adjustment is obtained with the BD139 transistor and the associated potentiometer. The emitter of this transistor is connected to the battery with the ampmeter in series and the voltmeter to measure the charging values. The battery voltage is controlled by a comparator from the voltage setting, the output of this is applied to the input "S" of the flip-flop configured by two opamps. The "R" input is controlled by the [CHARGE] button and the autoreset RC cell. This FLIP-FLOP is really the novelty of this version of the charger, the purpose is to do all the control with a single integrated circuit, the quadruple opamp LM324. The output of this FLIP-FLOP controls the BD137 transistor, which cuts off the power to the regulator when the charged battery voltage is reached.
ADJUSTMENT: Without any battery connected, move the cursor of the “BATTERY SIMULATION” potentiometer to the lower point (EMPTY), adjust the maximum value of charging current with the “CURRENT LIMIT” potentiometer, then gradually increase the value of the “LIMIT VOLTAGE" potentiometer until reaching the Maximum Voltage value for the inserted battery (this value must be above the nominal value of the battery for charging to occur). This setting is only necessary if you change the battery type
SUBCIRCUITS:
This example integrates several subcircuits located in the "data" folder into the ZIP attached. This folder must always be next to the "sim1" scheme so that it can be executed. A subcircuit is a “custom” circuit that accumulates a set of Simulide base components (primitive function) to obtain a new or an adapted function. These subcircuits are treated by Simulide as another component of its own structure. User can create his own subcircuits or use the ones published here in your own designs once the procedure is known, explained in detail in the Simulide tutorials: https://simulide.com/p/subcircuits/
* Communication with the author: Simulide/User/Messages/Defran
P. de Francisco.
Click for thumbs down.0Click for thumbs up.0
Last edited on March 17, 2024, 9:46 pm by Defran
